DIY 3D Wooden Puzzle Wall Clock (Quartz, Mechanical)
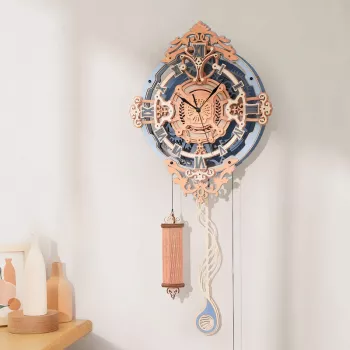
3D Wooden Puzzle DIY Wall Quartz Clock with Mechanical Design
A build-it-yourself wall clock that doubles as a satisfying 3D wooden puzzle brings hands-on crafting and functional décor together. This mechanical-style design highlights visible structure and layered details, while the quartz movement keeps time reliably for everyday use. When the last piece clicks into place, you’re left with something you can hang on the wall and enjoy daily—not just a model that sits on a shelf.
What Makes This Clock-Puzzle Different
This project stands out because it delivers a complete “build + use” experience. Instead of assembling a decorative object and stopping there, you’re creating a working wall clock with a workshop-inspired presence.
- Two-in-one experience: a model-building project that becomes a working wall clock.
- Mechanical-inspired look: layered components and gear-like styling for a bold, industrial-leaning aesthetic.
- Wood construction: warm texture that suits craft rooms, offices, bedrooms, or living spaces.
- Quartz timekeeping: consistent accuracy and simple operation after assembly.
- Gift-friendly project: combines a creative challenge with a practical end result.
Quartz clocks are known for their stability and everyday precision because they regulate time using a vibrating quartz crystal. For a straightforward overview of how quartz clock technology works, see Britannica’s quartz clock reference. For broader timekeeping standards and measurement context, the NIST Time and Frequency Division is a helpful authority.
Who It’s Great For
This clock kit fits a wide range of skill levels and spaces, especially for anyone who prefers tactile projects over screen time.
- DIY and maker hobbyists who enjoy model kits, puzzles, and hands-on builds.
- Teenagers and adults looking for a screen-free weekend project.
- Home décor enthusiasts who like statement pieces with a story behind them.
- Gift buyers searching for a buildable present for birthdays, holidays, or housewarmings.
- Classrooms and clubs (STEM/craft) wanting a timepiece project with visible structure.
If you enjoy this style of hands-on build, pairing it with another display-worthy project can make a great gift bundle. Consider the 3D Wooden Puzzle DIY Wall Quartz Clock Mechanical Design alongside a detailed tabletop build like the DIY 3D Puzzle Miniature House Kit.
Unboxing Checklist and Setup Before Building
A few minutes of prep can prevent most assembly hiccups. Wooden kits often rely on snug friction fits, so organization and gentle handling go a long way.
- Sort wooden sheets/pieces by shape and thickness before starting.
- Prepare a clean, well-lit surface; use a tray or small bowls for tiny parts.
- Recommended tools: hobby knife for stubborn tabs, fine sandpaper/emery board, wood glue (only if the kit allows), tweezers.
- Keep a soft cloth nearby to wipe dust; avoid moisture on unfinished wood.
- Plan for uninterrupted time; rushing increases the chance of snapped tabs or misalignment.
| Item | Why it helps | Optional? |
|---|---|---|
| Bright desk lamp | Reduces mistakes on small connectors and alignment points | Recommended |
| Fine sandpaper/emery board | Smooths tight joints without forcing pieces | Recommended |
| Tweezers | Places small parts cleanly and accurately | Optional |
| Hobby knife | Frees pieces cleanly if the cut is tight | Optional |
| Small parts tray | Prevents losing tiny components during steps | Recommended |
Assembly Flow (Practical, No-Fuss Approach)
For the cleanest results, focus on fit and alignment more than speed. A mechanical-style design looks best when layers sit flush and edges line up crisply.
- Dry-fit first: test how parts seat before applying any adhesive.
- Build in subassemblies: complete small modules (frames, layers, decorative elements) before combining.
- Check square and level: minor misalignment early can affect how the clock face sits on the wall.
- Avoid over-tight joints: sand lightly rather than forcing connections.
- Install the quartz movement last: wait until the main structure is stable and the mounting hole is clear.
- Final check: confirm hands clear the face and each other before hanging.
A helpful habit is to press pieces together with steady, even pressure close to the joint (instead of pushing from the far end). This reduces flexing and lowers the chance of cracking a narrow connector.
Hanging, Power, and Daily Use
Once assembled, treat it like a functional clock with a bit of extra care for the wood finish and raised details.
- Choose a stable wall spot away from direct heat sources and high humidity.
- Use an appropriate wall hook/anchor for the surface type (drywall, plaster, masonry).
- Insert the correct battery type specified by the movement; replace when timekeeping slows or stops.
- Set time using the rear dial; avoid moving hands directly unless the movement instructions allow it.
- Dust lightly with a dry microfiber cloth; avoid sprays that can stain wood or seep into the movement.
If you’re placing it in a workspace, keep it a few feet away from tool dust or finishing sprays. A quick dry wipe every week or two helps the layered “mechanical” look stay sharp.
Common Issues and Easy Fixes
Styling Ideas for a Mechanical Wooden Clock
Shop Buildable DIY Projects
- 3D Wooden Puzzle DIY Wall Quartz Clock Mechanical Design — a mechanical-style wall clock project with quartz timekeeping.
- DIY 3D Puzzle Miniature House Kit — a detailed miniature build for desks, shelves, and gifting.
FAQ
Is this clock difficult to assemble for beginners?
It’s usually more about patience than experience. Dry-fit pieces as you go, follow the step order closely, and use light sanding for tight joints instead of forcing tabs.
Does the clock keep accurate time after it’s built?
Quartz movements are designed for consistent timekeeping in normal indoor conditions. Accuracy typically comes down to using a fresh battery and ensuring the hands have proper clearance.
What should be done if the clock hands get stuck or touch?
Remove and reseat the hands so they’re level, parallel, and not rubbing each other or any raised design elements. If there’s a retaining nut, tighten it just enough to hold the hands securely without warping their spacing.








Leave a comment