Button Maker Machine Kit Guide: Make Custom Pins Fast

Button Maker Machine Kit: Create Custom Pins for Events, Clubs, and Crafts
A button maker machine kit turns printed designs into wearable pins and badges for school spirit, fundraisers, small businesses, and personal projects. Once the press is set up correctly and you follow a consistent workflow, it’s surprisingly easy to produce crisp, professional-looking buttons—even if it’s your first time making them.
What a Button Maker Machine Kit Is Best For
- Event accessories: name badges, volunteer IDs, team buttons, party favors
- Branding: small-batch promo pins for shops, markets, and packaging inserts
- Community projects: school clubs, campaigns, awareness ribbons and themes
- Gifting and keepsakes: photo buttons, reunion mementos, milestone celebrations
- Learning and makerspaces: hands-on design-to-product workflow for students
If you want quick turnaround and frequent customization, a dedicated press usually beats ordering small batches online—especially when designs change from week to week.
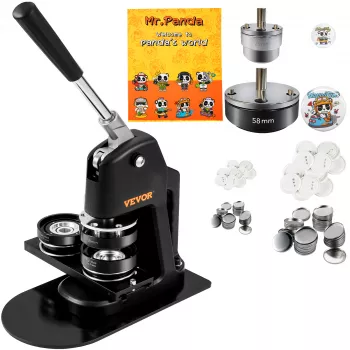
What’s Typically Included and Why Each Piece Matters
- Press body and handle: provides leverage to crimp the button parts together; a smooth, stable stroke is key for uniform edges.
- Die set(s): forms the button shape and size; correct alignment is what separates clean crimps from off-center backs.
- Button parts: metal shells, clear plastic film (mylar), and pin backs (or other back styles) that become the finished product.
- Cutting tool or circle cutter (when included): speeds up accurate, repeatable design circles—often the biggest time-saver for batch work.
- Setup items: small tools or fasteners for assembly and adjustments (varies by kit).
Setup Basics for Clean, Repeatable Pressing
- Stabilize the machine: place it on a firm, flat surface; any wobble can cause mis-crimps and uneven edges.
- Check the die seating: confirm the die set is fully seated and tightened before the first press.
- Keep paper consistent: big swings in paper thickness can change how the edge crimps.
- Organize parts: trays or small cups prevent mixing shells and backs—especially when making multiple designs.
- Test first: do a few test presses, then keep your settings and materials the same for the full run.
Step-by-Step: Making a Button from Start to Finish
1) Design and print
Use a circle template sized for your die, and leave a “safe margin” so faces and key text don’t ride too close to the edge. If you’re using photos, brighten slightly—colors can look deeper once viewed through the clear film.
2) Cut the circle
A circle cutter or punch helps create smooth edges and consistent diameter, which reduces wrinkles and improves crimp quality. If you hand-cut, take extra care to avoid jagged edges that can bunch under the film.
3) Load the front
Place the metal shell in the die, set the printed circle on top, then center the clear film (mylar) over the design. Keeping the film centered is one of the easiest ways to avoid bubbles.
4) Press the front
Pull the handle in a steady, complete stroke. Fast, jerky pulls can shift layers, while partial strokes can create incomplete crimps.
5) Load the back
Place the pin back into the second die position (or the next station, depending on the machine). Align the hinge so the pin swings freely once crimped.
6) Final press and quick check
Materials and Print Tips That Improve Durability
Quick Troubleshooting for Common Button Issues
| Issue | Likely cause | Fix |
|---|---|---|
| Wrinkled film on the front | Film not centered or paper circle slightly oversized | Re-center the film; verify circle size and cut cleanly |
| Button won’t crimp fully | Incorrect part order or die not seated | Confirm shell → print → film order; re-check die installation and tightness |
| Back separates from the front | Insufficient press force or misalignment | Press smoothly to full stroke; ensure parts sit flat in the die |
| Edge looks uneven or dented | Machine shifting or inconsistent handle pull | Stabilize the base; apply steady, repeatable pressure |
| Pin back is stiff or crooked | Back loaded off-center | Reload the back carefully; keep the pin hinge aligned before final press |
Project Ideas to Get More Value from the Kit
Care, Storage, and Safety Notes
- Clean dies gently: wipe with a soft cloth; avoid harsh solvents that can damage finishes.
- Maintain moving joints: lubricate sparingly if the mechanism starts to feel rough (follow manufacturer guidance when available).
- Store parts safely: small pieces can be a choking hazard; review basic guidance on child safety from the CDC.
- Use cutters carefully: keep fingers clear and cut on a stable surface; see tool safety best practices from OSHA.
- Batch workflow: prep printed circles first, then press in runs to reduce handling mistakes.
When a Button Maker Machine Kit Is a Good Fit
In-Stock Picks to Build Your Event-and-Craft Setup
- Button Maker Machine Kit ($154.01) — the core tool for pressing consistent pins and badges.
- Kids Wooden Tool Bench Set ($86.01) — a fun, hands-on companion for craft rooms and maker-friendly spaces.
- Personalized Balloon Letter Necklace ($5.51) — a simple add-on for party favors or team spirit bundles alongside custom buttons.
FAQ
What size designs should be printed for a standard button?
Use the template for the specific die size and keep key text, logos, and faces inside a safe margin. That buffer prevents important details from getting wrapped and trimmed during crimping.
Why do some buttons come out wrinkled or with bubbles under the clear film?
Wrinkles and bubbles usually happen when the film isn’t centered or the paper circle is slightly oversized. Re-center the film carefully and confirm your cutter produces consistent circles with clean edges.
Can a button maker kit be used for fundraisers and school events?
Yes—button pressing is well-suited for batch production. Prepare designs in sets, run a few test presses, then keep materials and handle pressure consistent for uniform results across the whole run.


Leave a comment