Kids Toy Storage Organizer: Faster Cleanup, Less Clutter
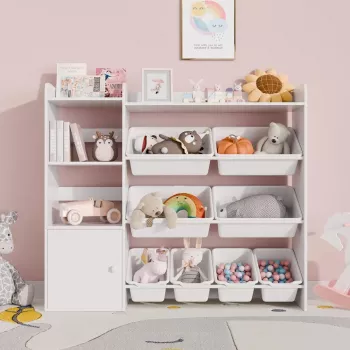
Kids Toy Storage Organizer for a Calmer Playroom
A solid toy storage setup makes it easier for kids to find what they want, clean up faster, and keep small pieces from spreading throughout the house. A Kids Toy Storage Organizer can turn a busy corner into clear zones for bins, books, and everyday favorites—without making the room feel like a warehouse. The goal is simple: create a place for everything so cleanup becomes routine, not a daily battle.
What a Toy Storage Organizer Solves (Beyond Clutter)
- Reduces visual noise so play spaces feel calmer and more inviting.
- Supports independent cleanup with easy-to-reach, clearly separated storage areas.
- Protects toys from damage by keeping them off the floor and away from foot traffic.
- Helps rotate toys: store a portion out of sight to refresh interest and reduce overwhelm.
- Keeps small parts grouped, lowering the chance of missing pieces and accidental messes.
When the floor stays clearer, play gets better. Kids can spread out a project, find that one missing piece faster, and transition to the next activity without everything turning into one mixed pile. For safety reminders around toys and age-appropriate use, see guidance from the U.S. Consumer Product Safety Commission.
Key Features That Make Storage Kid-Friendly
- Accessible height: bins and shelves should be reachable so kids can return items without help.
- Mixed storage: open bins for bulky toys, smaller containers for pieces, and a shelf space for display or books.
- Stable build: a sturdy base reduces wobble during enthusiastic play and cleanup.
- Easy-to-clean surfaces: wipeable materials handle sticky hands and craft residue.
- Rounded edges and smooth finishes: reduces bumps and snags in tight play areas.
- Clear categories: grouping by type (blocks, dolls, cars, crafts) works better than storing by brand or theme.
Toy Categories That Store Well Together
| Toy type | Best storage method | Label idea |
|---|---|---|
| Building blocks and bricks | Medium bin with a smaller parts cup | “Blocks” |
| Cars, trains, small figures | Shallow bin or tray-style bin | “Vehicles” |
| Dolls and plush | Large bin or open shelf basket | “Dolls & Plush” |
| Arts and crafts | Lidded container + small organizers inside | “Crafts” |
| Puzzles and board games | Vertical shelf or file-style organizer | “Puzzles/Games” |
| Books | Forward-facing shelf or low book rack | “Books” |
Where This Organizer Fits Best at Home
- Playroom: place near the primary play zone to shorten the distance between play and put-away.
- Living room corner: choose a tidy, unified bin system so toys can be stored without taking over shared space.
- Bedroom: keep a smaller selection within reach; store overflow elsewhere to reduce distraction at bedtime.
- Entryway or mudroom: dedicate a bin for outdoor toys (chalk, bubbles, balls) to prevent tracking debris indoors.
- Closet companion: pair an open organizer outside the closet with labeled containers inside for toy rotation.
A helpful rule: storage should live where play actually happens. If the organizer is tucked far away, cleanup becomes a long trip (and kids tend to abandon it halfway). When you keep bins close, putting things away feels like the natural “next step” after play.
A Simple Setup Plan That Stays Organized
- Sort first, store second: quickly group toys into broad types before assigning bins.
- Start with fewer categories: 4–6 bins is usually easier to maintain than 12 highly specific labels.
- Use picture labels for pre-readers: pair a word with a simple icon or photo.
- Keep daily favorites at eye level: store occasional items higher or deeper.
- Create a “quick sweep” bin: use it for an end-of-day reset; empty it weekly so it doesn’t become permanent clutter.
- Do a 10-minute reset routine: a short, consistent cleanup window works better than occasional major purges.
If your space tends to overflow, try rotating “big footprint” toys. Keep one or two larger sets available and store the rest. When it’s time for a refresh, swap them out. This is also a great moment to introduce a quieter project like a DIY 3D Puzzle Miniature House Kit—something that feels new without adding more loose pieces to every surface.
Safety and Durability Checklist
- Stability: ensure the organizer sits level; avoid placing it where kids climb to reach something else.
- Weight distribution: heavier toys belong in lower bins to reduce tipping risk.
- Pinch points: watch for lids or hinged pieces that can catch small fingers.
- Small-part control: use lidded containers for sets with tiny components.
- Material care: confirm surfaces can be wiped and dried quickly to prevent lingering moisture or odors.
- Placement: keep away from heat sources and avoid blocking pathways in high-traffic rooms.
Anything that reduces trips and tumbles is a win in a busy home. For broader home safety context, the CDC’s fall prevention resources are a useful reference point when arranging furniture and pathways.
Kids Toy Storage Organizer: Quick Overview
At-a-Glance Details
| Item | Details |
|---|---|
| Product | Kids Toy Storage Organizer |
| Price | 121.01 USD |
| Availability | In stock |
Care, Cleaning, and Keeping It Looking Good
If you’re managing mixed ages, add a simple rule: “tiny pieces live in lidded containers.” That one decision reduces the most common cleanup headache and supports safer, more consistent play. For additional toy safety tips (including age guidance), the American Academy of Pediatrics provides a helpful overview at HealthyChildren.org.
FAQ
What’s the easiest way to get kids to use a toy organizer?
Keep categories broad, store favorites at reachable height, and use picture labels for pre-readers. A short daily reset at the same time each day helps the routine stick.
How many bins or sections should a toy organizer have?
Start with 4–6 main categories and only add more if cleanup stays consistent for a couple of weeks. Too many sections often leads to mis-sorting and frustration.
Should toys be stored by type or by set?
Store everyday toys by type for quick cleanup, and store special sets together in a dedicated container. This keeps kits complete and reduces lost pieces.






Leave a comment