Garden House Book Nook DIY Kit: Mini Greenhouse Shelf Build
Garden House Book Nook DIY Kit: Build a Miniature Greenhouse Scene for Your Bookshelf
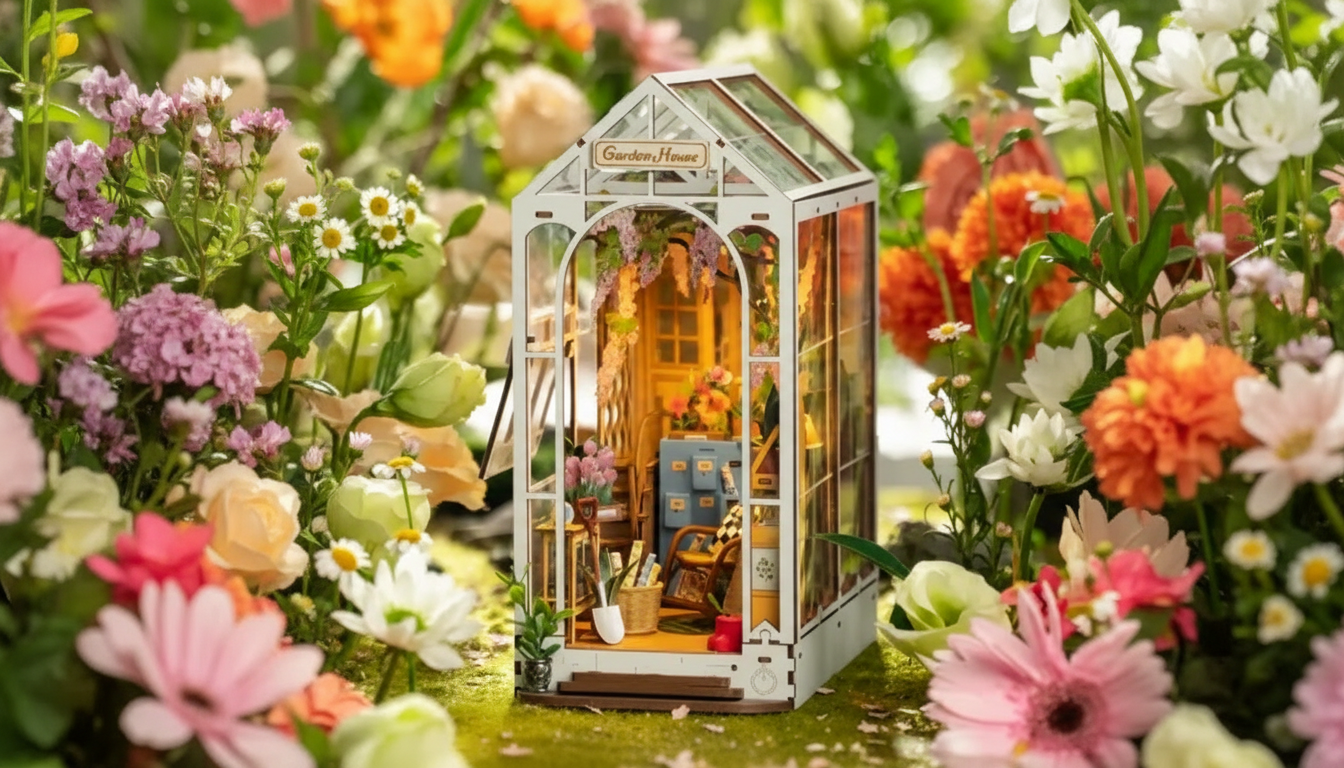
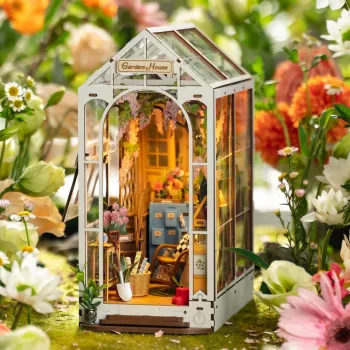
A garden-themed book nook turns an ordinary shelf into a small, glowing scene—part decor, part relaxing project. The Garden House Book Nook DIY Kit is designed for hands-on crafting: assembling miniature details, creating depth between book spines, and finishing with a display-ready nook that feels like a tiny greenhouse tucked inside the library.
What a garden house book nook is
A book nook is a narrow miniature diorama made to slide right between novels and hardcovers. From the front, it creates the illusion of a hidden space on your shelf—like peeking through a doorway into another world.
Garden house designs lean into greenhouse charm: window-like panels, plant-filled corners, and warm ambient lighting effects that mimic a cozy interior glow. The result is functional shelf decor that fits like a book, but displays like a small scene when viewed head-on.
These projects are especially popular for winding down in the evening, creating a themed reading corner, or gifting to anyone who enjoys model building, miniatures, and detail-oriented crafts.
What’s included and what may be needed
Most garden house book nook kits come with pre-cut structural pieces that form the frame and interior layers. Those layers are what create the signature “tunnel” view and sense of depth. You’ll also get miniature decorative parts that bring the garden-house look to life—think panels, window details, and small scene elements.
Lighting components may be included depending on the kit version. If yours includes lights, plan ahead for the correct small batteries (and test the switch early so you don’t have to reopen finished sections).
To make the build smoother, it helps to have a few common craft tools ready: clear-drying glue, tweezers, small scissors or a hobby knife, and a cutting mat. Optional upgrades like acrylic paint pens for edge touch-ups can make the finished nook look more polished.
Quick readiness checklist
| Item | Why it helps | Optional or recommended |
|---|---|---|
| Precision glue | Cleaner joins and less visible residue | Recommended |
| Tweezers | Places tiny parts accurately | Recommended |
| Cutting mat / board | Protects surfaces while trimming | Recommended |
| Small clips or tape | Holds pieces while glue sets | Optional |
| Paint marker / sandpaper | Cleans edges and improves finish | Optional |
How the build typically goes (step-by-step overview)
While each kit has its own instructions, the workflow tends to follow a similar rhythm. A calm, methodical pace usually produces the cleanest result.
- Sort and label parts before gluing: Lay pieces out in build order to avoid losing small details and to spot similar-looking parts early.
- Assemble the base and side walls first: Getting the foundation square and aligned makes everything else fit more naturally.
- Build background layers next: Depth comes from spacing and layering, so keep walls straight and avoid forcing pieces that feel slightly off.
- Add greenhouse-style features from back to front: Installing windows, panels, and decor from the rear forward gives you room to work without bumping finished details.
- Install lighting near the end (if included): Test the switch, routing, and light placement before final sealing so you can adjust brightness and avoid harsh hotspots.
- Finish with edge clean-up: Touch up visible edges, lightly dust, and let glue cure fully before placing it on a shelf.
If you want a convenient way to power small USB accessories while crafting (or to keep your phone charged during longer sessions), a Compact Portable Power Bank can be a handy add-on to your workspace.
Tips for a cleaner, more realistic finish
Small habits make a big difference in miniatures. The goal is to keep the front view crisp, with fewer glue marks and cleaner lines.
For general guidance on safe handling of small parts and hobby components—especially if kids may be nearby—review the CPSC’s consumer safety education materials at CPSC – General Product Safety Information.
Where it looks best on a shelf
A good gift for crafters and readers
Related build: another miniature kit option
If you love the hands-on process but want a different display format, consider a tabletop build like the DIY 3D Puzzle Miniature House Kit. It offers a similar satisfaction—careful assembly, tiny details, and a finished piece you’ll want to show off—but with a broader “dollhouse” feel rather than a tunnel-style shelf insert.
For extra inspiration on why miniature scenes are so endlessly collectible and creative, browse features in Smithsonian Magazine’s miniatures topic.
At-a-glance comparison
| Feature | Garden House Book Nook DIY Kit | DIY 3D Puzzle Miniature House Kit |
|---|---|---|
| Display style | Between books on a shelf | Standalone mini house display |
| Visual effect | Layered depth / tunnel view | Room-like scene / exterior form |
| Best for | Readers, shelf decor, cozy lighting | Miniature collectors, tabletop decor |
| Tools typically used | Glue, tweezers, small cutter | Glue, tweezers, small cutter |
FAQ
Is this kit beginner-friendly?
It’s approachable for patient beginners, especially if you sort pieces first, dry-fit before gluing, and use tweezers for small parts. Having basic craft tools on hand makes the whole process feel more relaxed and controlled.
Do I need special tools or glue?
No special tools are required, but clear-drying craft glue, tweezers, scissors or a hobby knife, and a cutting mat are the most helpful basics. Small clips or tape and a paint marker for touch-ups are optional upgrades that can improve the finish.
How can the finished book nook be kept dust-free?
Place it away from vents and high-traffic dust sources, and do occasional gentle cleaning with a soft brush or an air blower. Keeping it between books also provides some natural shielding, and avoiding humid or sunny spots helps it stay crisp over time.


Leave a comment