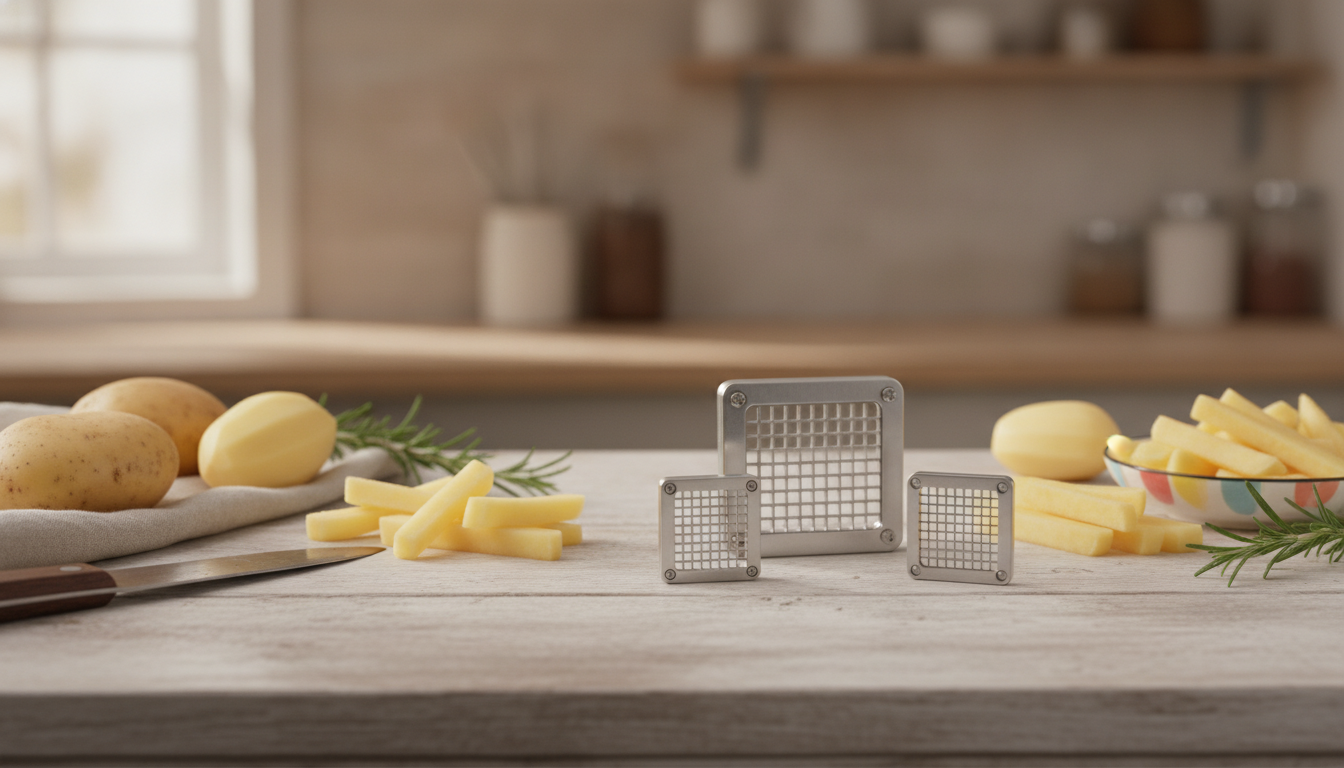
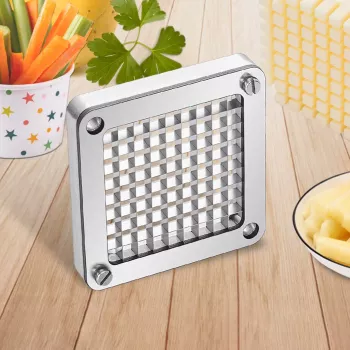
French Fry Cutter Replacement Blades: 3 Sizes, Stainless
Get Your Fry Cutter Cutting Clean Again
Dull or bent blades can turn a reliable fry cutter into a struggle—uneven sticks, crushed potatoes, and extra effort on every push. A replacement blade set restores clean, consistent cuts and helps keep prep moving smoothly. This stainless steel set offers three common fry sizes (1/4, 3/8, and 1/2 inch) so it’s easy to switch from thin, crispy fries to thicker steak fries or veggie sticks without replacing the whole cutter.
If you’re ready to bring back smooth, straight cuts, see the 3/8, 1/4, 1/2 Inch French Fry Cutter Replacement Blades – Stainless Steel Set and confirm fit details against your current cutter.
What This Replacement Blade Set Is Designed to Solve
- Restores straight, uniform cuts when existing blades are dull, nicked, or misaligned.
- Reduces crushing and wedging that can happen when blades lose sharpness.
- Helps maintain consistent portion sizes for home cooking or busy prep routines.
- Offers multiple cut sizes so one cutter can serve different styles of fries and vegetables.
A sharp, properly aligned grid does more than look nicer on the plate—it also cooks more evenly. When sticks are close to the same thickness, you spend less time chasing “some too dark, some too pale” results in the oven, fryer, or air fryer.
What’s Included and How the Three Sizes Change Results
This set includes three blade/grid options: 1/4 inch, 3/8 inch, and 1/2 inch cuts. Each size changes the surface-area-to-center ratio, which impacts crispness, cook time, and the final bite.
- 1/4 inch: Thin sticks that tend to cook faster and crisp up more easily.
- 3/8 inch: A middle-ground size with a balanced crisp/tender texture.
- 1/2 inch: Thick sticks that keep a soft interior—great for hearty fries.
These grids can also be useful beyond potatoes. Firm vegetables like carrots, zucchini, and sweet potatoes often cut well (assuming your cutter and pusher block are compatible and the produce is trimmed to feed straight).
Cut size guide for common fry styles
| Blade size | Approx. stick thickness | Typical best uses |
|---|---|---|
| 1/4 inch | Thin | Shoestring-style fries, quick air-fryer batches, crispier texture |
| 3/8 inch | Medium | Everyday fries, balanced crisp/tender bite, versatile for mixed veg |
| 1/2 inch | Thick | Steak fries, wedges (after cutting), hearty sweet potato fries |
Compatibility and Fit Checks Before Ordering
Replacement grids aren’t universally interchangeable. Before purchasing, take a couple minutes to compare your current assembly to the replacement set so the install goes smoothly.
- Confirm the replacement blade/grid matches the mounting style and dimensions of the existing cutter’s blade frame.
- Check how the blade assembly attaches (screws, slide-in tracks, or bracket style) and compare to the current parts.
- Verify the cutter’s pusher block aligns with the grid size; mismatched pushers can cause jamming or incomplete cuts.
- If the cutter is used commercially, confirm the replacement part matches the model’s intended duty level and hardware.
Tip: a quick photo of the current grid from the front and the mounting points from the back can help you compare dimensions and attachment styles at a glance.
Why Stainless Steel Matters for Prep Tools
Stainless steel is a go-to material for food-contact cutting surfaces for good reason. It’s designed to handle moisture, salt, and food acids better than untreated steels (especially when cleaned and dried promptly).
- Resists rust better than untreated steels when dried and stored properly.
- Holds up to repeated contact with moisture, salt, and food acids.
- Supports thorough cleaning practices when handled and maintained correctly.
- Maintains a smoother cutting action when blades are kept clean and free of stuck starch.
For baseline guidance on keeping food-contact surfaces clean, see the FDA Food Code and the USDA FSIS “Clean” kitchen guidance.
Replacing the Blades: A Practical Install Walkthrough
Most blade swaps are straightforward, but taking an extra minute to keep everything square and evenly tightened can prevent sticking later.
- Remove the cutter from use and disconnect any lever or handle tension if applicable.
- Take photos of the current blade assembly and hardware to simplify reassembly.
- Unscrew or release the old grid, keeping washers and fasteners organized.
- Seat the new blade/grid squarely so it sits flush and centered.
- Tighten hardware evenly; uneven tightening can twist the grid and cause sticking.
- Run a test cut with a peeled potato to confirm alignment before full prep.
If the first test cut feels rough, stop and re-check that the grid is centered and the pusher block is meeting the openings cleanly—forcing the handle can bend parts and make the issue worse.
Cleaning and Care to Keep Cuts Smooth
Common Issues and Quick Fixes
When a Replacement Set Makes More Sense Than a New Cutter
More In-Stock Picks
- 3/8, 1/4, 1/2 Inch French Fry Cutter Replacement Blades – Stainless Steel Set
- Personalized Balloon Letter Necklace
- Kids Wooden Tool Bench Set
FAQ
Will these replacement blades fit any French fry cutter?
Fit depends on your cutter’s model, grid dimensions, and mounting style. Measure your current grid/frame, compare attachment points (screws, tracks, or brackets), and confirm your pusher block aligns with the grid openings before ordering.
What’s the difference between 1/4, 3/8, and 1/2 inch cuts?
1/4 inch makes thinner fries that typically cook faster and crisp up more. 3/8 inch is a versatile everyday size with a balanced bite, while 1/2 inch creates thicker “steak fry” sticks with a heartier center.
How should stainless steel blades be cleaned to prevent rust or staining?
Rinse promptly, brush out starch from the grid, and dry thoroughly before storage. Avoid abrasive scraping that can nick edges, and store the blades dry to reduce spotting and corrosion risk.


Leave a comment